Tuesday, April 26, 2011

Finally!


In April 2010, I started working with a wonderful family to help them decorate the sunroom in their charming brick, cedar shake-roofed home in south Charlotte.  They had lived in the house for over 13 years, with several renovations already under their belt.  The husband told me that one of the reasons they bought the house was because of the beautiful sunroom on the side of the home which opened up onto a secluded, shaded patio.  He wanted to make that room into a multi-functional room where they could entertain, hang out and watch TV, and have family meals.

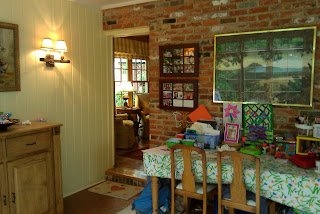
So finally, after a year we have completed the room!  I thought i would share some before and after pictures.  First the before:


It's hard to tell from the pictures, but the sofa was faded, the chair and ottoman were threadbare, and the room was filled with the kids art supplies and DVDs.   We cleared out the room, painted the planked walls and exposed brick wall, added some new sisal wall-to-wall carpeting, and some new furniture, and Voila....the AFTER:


We customized a new sectional sofa that fit exactly into the space below the windows.  The drapes added so much height to the room, and really made it feel more comfortable.


The one thing in the room that I am most excited about (and waited the longest for!) is the banquette I designed for the eating area.  I wanted a piece that did not block the beautiful windows and the view to the patio, but I also wanted an interesting piece that would be attractive from the adjacent den.   

Here it is, in the completed room:


It's a very unique piece, and I am so pleased with the construction.  We used a soft woven linen-look fabric that had some beige, cream, and blue-green yarns, that ties in with the drapes but overall appears to be a soft neutral color.  The base is finished with a dark mahogany stain, and the seat back is accented with antique nailhead trim.   Both the furniture manufacturer and the movers mentioned they had never seen any thing like it. 

I guess good things come to those who wait!  


Tuesday, April 19, 2011

Spring 2011 Furniture Market


Hello all,

The 2011 Spring High Point Furniture Market was this past April 2nd - 7th, and I was lucky enough to attend this year, even though it was a very short trip.  I know every design blogger out there will have a similar post where she/he describes how wonderful it was and what amazing designs and lines are out there, so I just have to join in too:

I have to say that I just had enough time to hit the high points (ha!) so I really just saw a small sampling of what was new and different for this season.  Overall, I felt that the 'rustic-reclaimed-waxed-weathered/whitewashed wood' look is still very prominent especially throughout the vendors in Interhall.  I personally am ready to see something new!  Nothing against Restoration Hardware (I actually really like RH) but once it's hit that market isn't it on it's way out?

Here are a few of the pieces that I thought were new and different.  One vendor in particular caught my eye with their amazing light fixtures:

This vendor based in Charleston, SC called Ro Sham Beaux (which is another name for 'Rock, Paper, Scissors') has some amazing lighting fixtures made from recycled steel and glass beads.  Here are some photos of some of their other fixtures:


I think the last one would look amazing in a tall entry foyer.

Another line of lighting that I loved was from Lowcountry Originals.  They are from Bluffton, SC and recently won in the home category in Garden & Gun magazine's 'Made in the South' 2010.  See the full article here.

Here's one of their newly designed chandeliers, which mimics marsh grasses.  I love the brushed nickel finish:


There were also some noteworthy pieces in the 'weathered wood' category from Gabby Home (a division of Summer Classics, the outdoor furniture company).  The first was interesting because of the iron detailing in the planks on the cabinet doors:


Also Dovetail furniture had some pieces that reminded me of the farmhouse project I've been working on:


Lastly, when we were wrapping up our day we stopped in at a very colorful, very bohemian, very Anthropologie-inspired showroom called Design Legacy by Kelly O'Neal out of Dallas, TX.  Her specialty is hand-screened art fabrics.  It was such a refreshing change.  And I've always loved color:


Her color combinations were just so striking, but my photographs don't do it justice.  My absolute favorite was this vintage porthole window with a chinese pagoda print:


Hopefully i'll be able to use some of these wonderful pieces on a project soon!  If, not maybe on a 'project' in my own home . . . .

Thanks for reading,
Bronwyn

Tuesday, April 12, 2011

Hand Drawing


You probably noticed in my last post that my architectural renderings were not done in AutoCAD, but instead with plain old pencil, scale, and triangle.  My incredibly talented mentor, Emily Bourgeois, and her draftsman, Steve Nelson, taught me the value of hand rendering and inspired me to continue to use hand drawings to express my ideas even though I protested that AutoCAD can be infinitely easier at times.  Emily once told me 'All of the architects/designers that I truly admire use hand rendering'.  She convinced me that when you can see the entire space on the paper all at once, and you (not the computer) are responsible for drawing the measurements precisely right, and you are calculating the mid-point and you are dividing the space into equal parts, then the space begins to take shape in your mind and you begin visualize and feel a part of the space as if it already existed and you could walk around in it.  You begin to feel what will and will not work in the space instead of letting the computer blatantly show you 'there's obviously not enough space for a dishwasher in that island, duh'.

I'll illustrate my point (ha - so many puns there, i couldn't resist) with an example.  First, here is an AutoCAD drawing that I completed while in school:


Pretty boring, right?  To give it credit, it was only a school assignment in drafting and not truly a designer kitchen.   But regardless, upon first glance you can't even tell what it is....it could be a basement workbench for all you know until you realize there's a rangetop and a microwave.  AutoCAD drawings don't have much depth so it's hard to read and you certainly aren't going to fall in love with any design when it's presented in that fashion.

Let's compare it to a hand drawing.  This is a similar kitchen elevation that I completed for a client.  Obviously I did not have to include the subway tile backsplash or the books in the niche above the refrigerator, but i wanted to use this drawing to tell a story, and to impart my design ideas.  Simply the addition of the shading in the toe kick adds so much more dimension to the drawing.


All of my designs start out with drawings - either scaled drawings or sketches.  Usually i do some rough sketches of the design first, and then once I start on the measured drawings I will determine if the proportions will work in the amount of space I have to work with.  Then I will design, tweak, and add details accordingly.   I enjoy the process of completing the drawings, and I love making them look as realistic and stylized as possible.  I'll share the kitchen elevation drawings from the Farmhouse project in a future post.

Thanks for reading!